

Hallway Makeover Before & After - How We Did It.
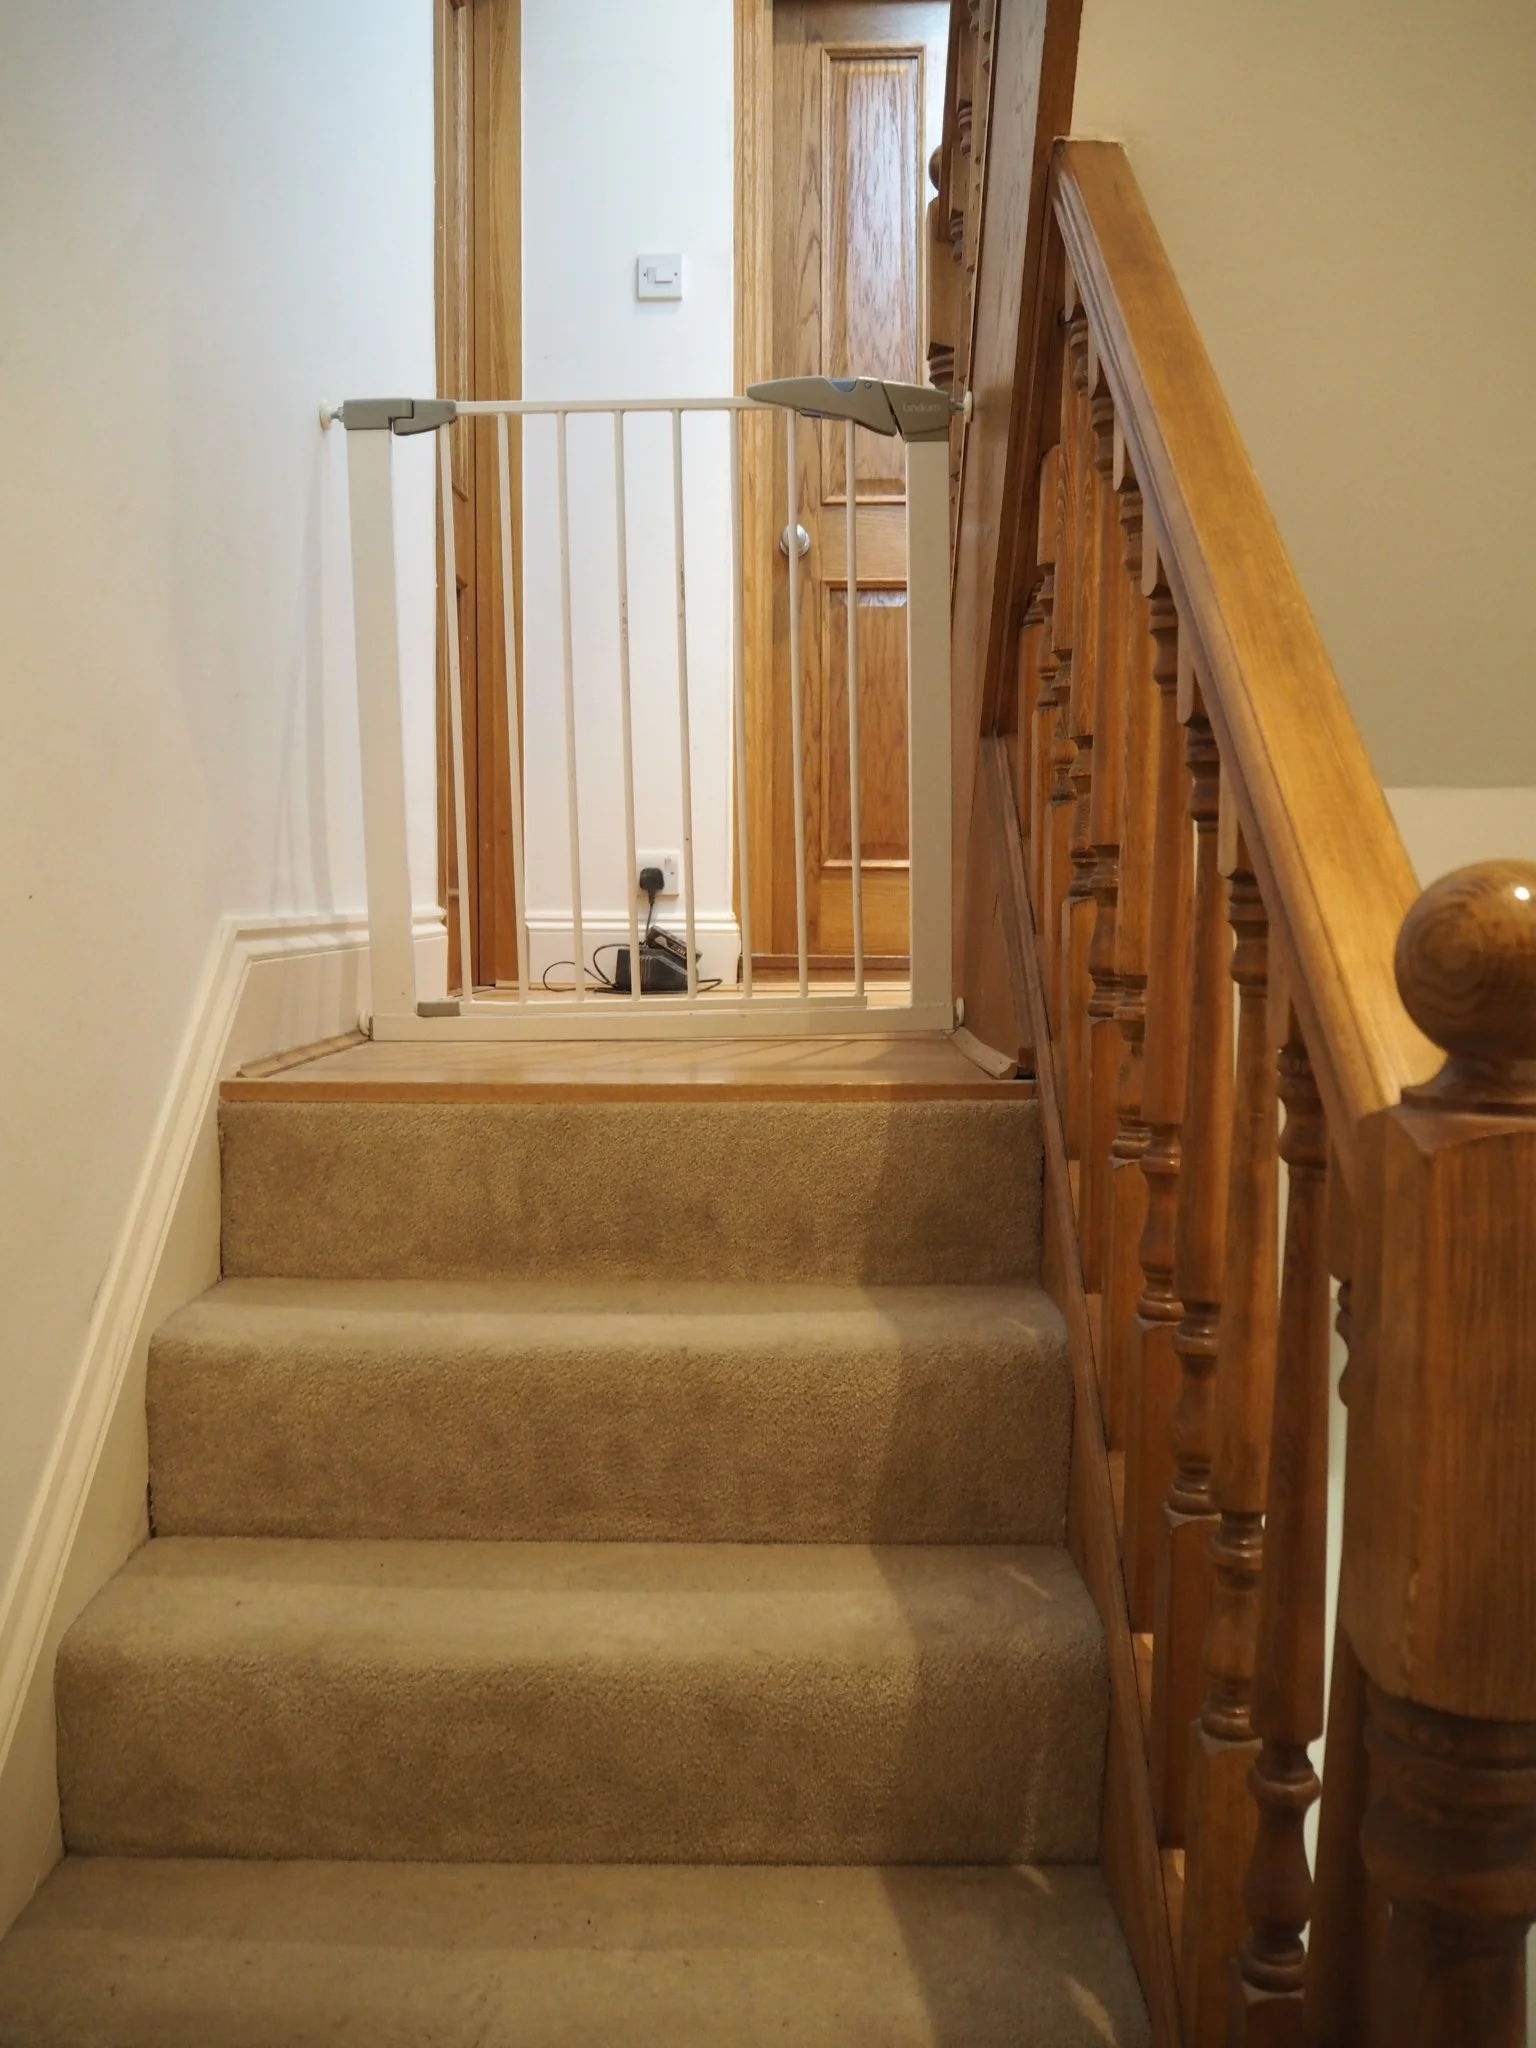
Sometimes we finish projects in our house and I look back at the Before pics and wonder how on earth we (I) lived with the beige for so long. Ok, so every time we finish a project I think that. The thing is, we are the world’s slowest renovators. We’re four years in with this house and we still have a kitchen, a bathroom and a bedroom to go. Not to mention the fact I want to tackle the lounge again. Oops!
Apart from cashflow, the main reason we left the hallway looking like this for so long was because we knew we were going to rip out the bathroom and that was going to be a lot of upheaval and mess being dragged through the house. So we waited. And waited some more.

But the thing about taking things slowly is that a) you appreciate it so much more when you finally do get the space you dreamed of, and b) You get the time to think about what you really want without making a knee jerk decision based on that really cool house you saw on Insta.
That final point is particularly important if said Insta-crushworthy house has an entrance hall the size of a 5-a-side football pitch, while yours has enough room for a Bugaboo and you’ll have to breathe in if you want to actually enter your own home while said Bugaboo is parked up. For the avoidance of doubt, our house presents the second option. If you’re claustrophobic, this isn’t the house for you.

So here is a list of things I was able to establish while I waited until the time was right for us to tackle the hallway.
1) Our hallway and landings are all narrow and the entrance doesn’t get much natural light so dark shades were a big no no for me. There is a school of thought that if the space is small and dark, why not embrace the darkness to create a moody, sexy space. i love this idea but it wasn’t right for our hallway. Whatever colour I picked needed to work across four floors and I think I’d have felt overwhelmed if it was all gloomy.
2) There are a lot of stairs, and they are all different widths. So a traditional stair runner was out of bounds because of the total palava of trying making the pattern fit each individual flight of stairs. Also see point 4.
3) Same for wallpaper. It would have needed so much wallpaper, which is quite the commitment, and the walls have major quirks which would have made them very difficult to wallpaper over. Plus I’ve fallen a bit out of love with wallpaper recently.
4) There was laminate on each landing. if we pulled it up there was concrete underneath…so continuing the runner onto the landings was also out of the question. It would need to be fully carpeted or replaced with another type of wood flooring, which seemed like an unnecessary complication.
So wallpaper was out, jazzy stair runners were out and dark colours were out. Hmm so far, so boring. Which left me thinking long and hard about how to introduce some character. After all, this is the room that sets the first impression for the rest of your home.
I’m going to divide this bit into sub categories so it’s easier to digest.
Walls
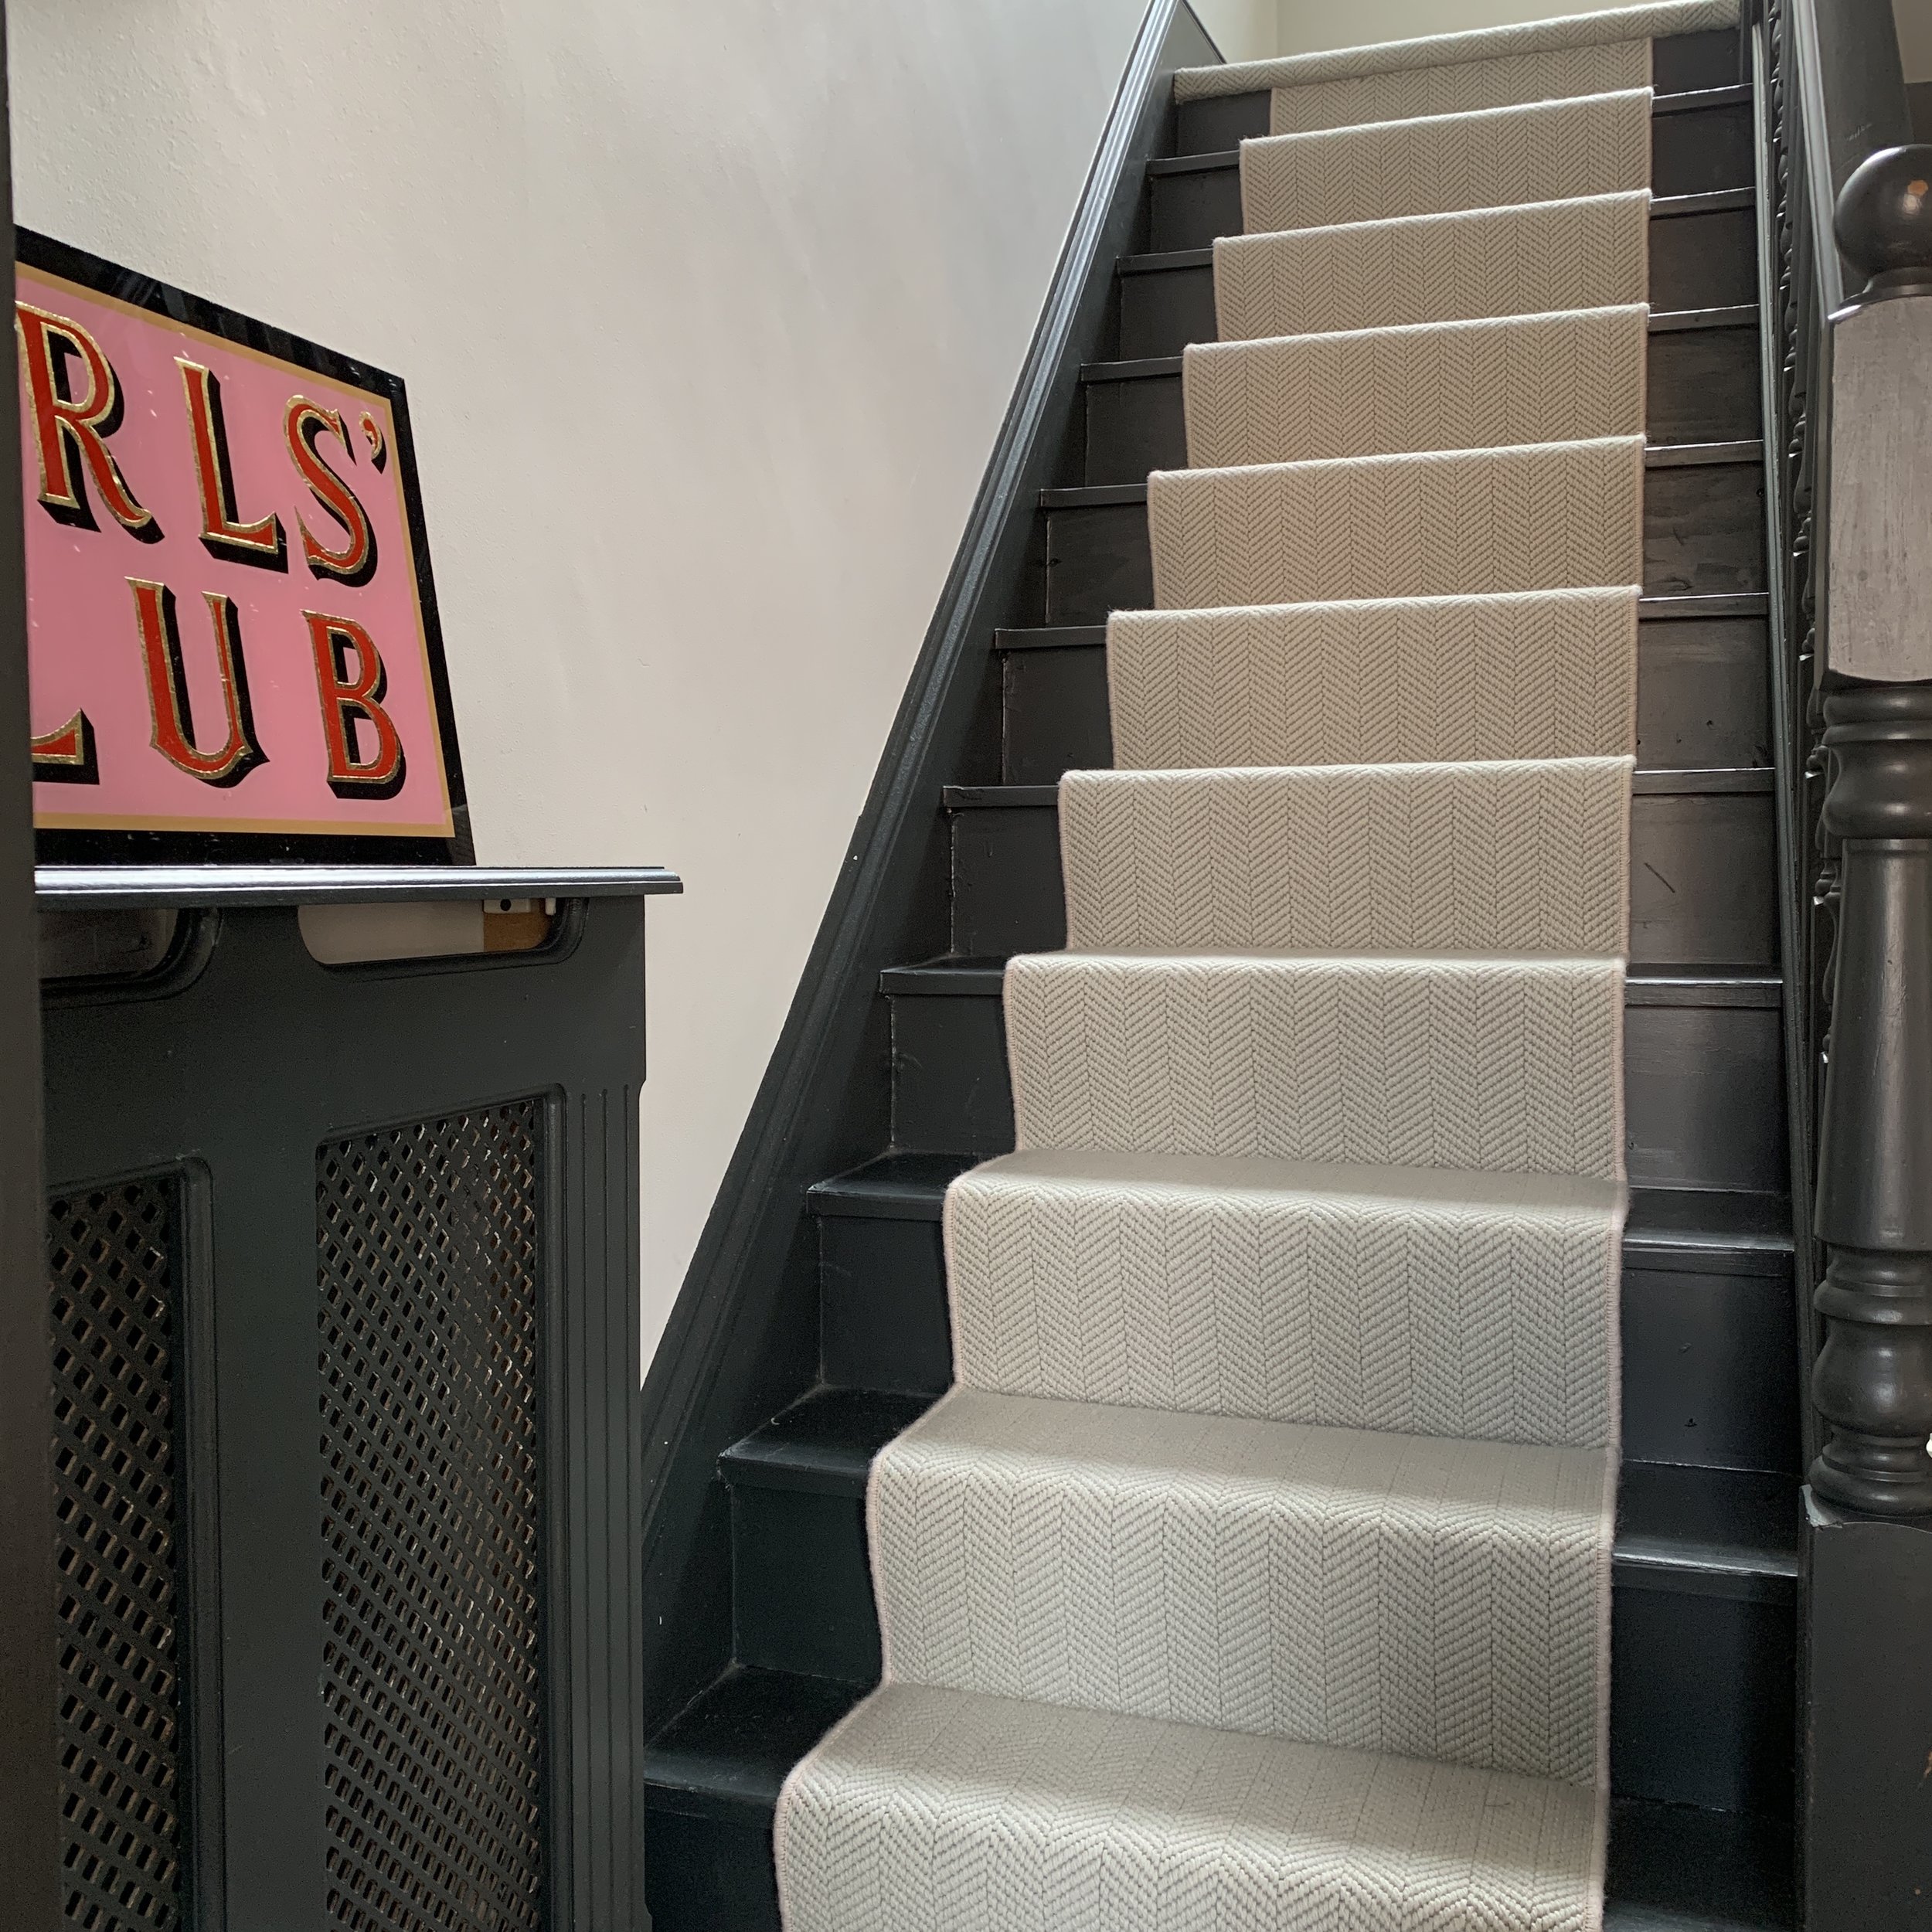
The first decision was an easy one. I knew I was going to paint the woodwork dark. But wait, i’ve just been banging on about having a bright space right? Right. But if you keep the walls light, you can afford to go dark on the woodwork. Plus it’s an effective way of introducing some impact to what is otherwise shaping up to be a pretty plain hallway. And dark woodwork is oh so classy. I decided on Little Greene’s Lamp Black, a very deep charcoal grey with no blue or green undertones. It’s dead smart. At this point I should say that I had already decided I was going to paint all the woodwork myself to save money. But I’ve mentioned the fact our house is tall and skinny right? There are 75 spindles, 48 steps and 7 doors plus 2 radiator covers in total. And I sanded and painted them alllllllll. Primer, plus 2-3 coats. I deserve a medal for services to painting. Luckily I really love them. And no, I won’t ever be repainting them.

When it came to choosing a colour for the walls, I struggled. It had to be light but it had to work all the way up. White was a no no…just because, well, white. I tested varying shades of plaster and dusky pink but we already have a pink kitchen and I felt that would be too much pink. I know, I know, there’s no such thing as too much pink. So I returned to the familiarity of a colour I used in our old house, Little Greene’s French Grey. It’s one of the best pale greys around…and it comes in scales from light to dark. We went with French Grey Mid. It looks excellent with the Lamp Black. Its light, but also has a warmth to it. I’m a big fan and often recommend it. By the time it came to do the walls I have to admit I was absolutely sick of the sight of the paintbrush, plus we have very high ceilings, so I got someone in for two days to blitz the walls for me. Which was a good decision.
I couldn’t stay away from the pink entirely however, and used Rockett St George’s gorgeous dusky pink shade Bohemia on the inside of the front door and took the very last minute impulse decision to paint the cornicing in the same pink. Again, that was a good decision. I love it! It adds an element of fun and a pop of colour to an otherwise monochrome space.

Floors
So I’ve dealt with the flooring no no’s above. I didn’t mention the entranceway itself. Again, it had more laminate flooring that I couldn’t wait to rip up. And again, underneath was more concrete. This was my opportunity to make a statement and introduce some pattern. So I started looking at encaustic tiles. I was sticking to a mostly monochrome palette in keeping with the woodwork and walls and kept coming back to Bert & May’s Churriana. It’s versatile in that you can lay it in different patterns. I liked the idea of it being a modern twist on the traditional Victorian tiled halls. Now, having already used encaustic tiles in our bathroom renovation ** I already knew all about the fitting and sealing process. They ideally need to be sealed and then left and not stepped on for a week before grouting. But how on earth was that going to work? We decided to wait until we were going on holiday and got it all done by our trusted builders while we were away. Now I have to admit I was nervous about not being there to oversee everything. They must have been bloody over the moon about me not being there breathing down their necks though. We came home from 10 days in Cornwall and I had no reason to fear, they looked amazing.
So the tiles are down, the stairs and spindles were painted and the wall colour chosen, now the hunt was on to find a carpet that would work as a runner in this space. First of all you should know that most carpets can be cut as runners for staircases and then taped, or whipped at the edges. I thought about going with a colourful carpet at first but realised I wanted something that would stand the test of time…and something which would still work if I decided to change the wall colour at any point in the future. Which let’s face it, is pretty likely.
The first place that sprung to mind when I was thinking about simple, modern, elegant carpet was Kersaint Cobb. They specialise in exactly this, in a range of colours across the neutral palette. For transparency, Kersaint Cobb gifted me the carpet, but I had researched carpet options extensively and I approached them about working with me because they were the brand whose product I loved. Initially I thought I wanted a Jute or Sisal but I was advised by them that this wasn’t ideal for a runner because of the weave and it can actually become quite slippy and therefore not ideal with small children tearing around the house.
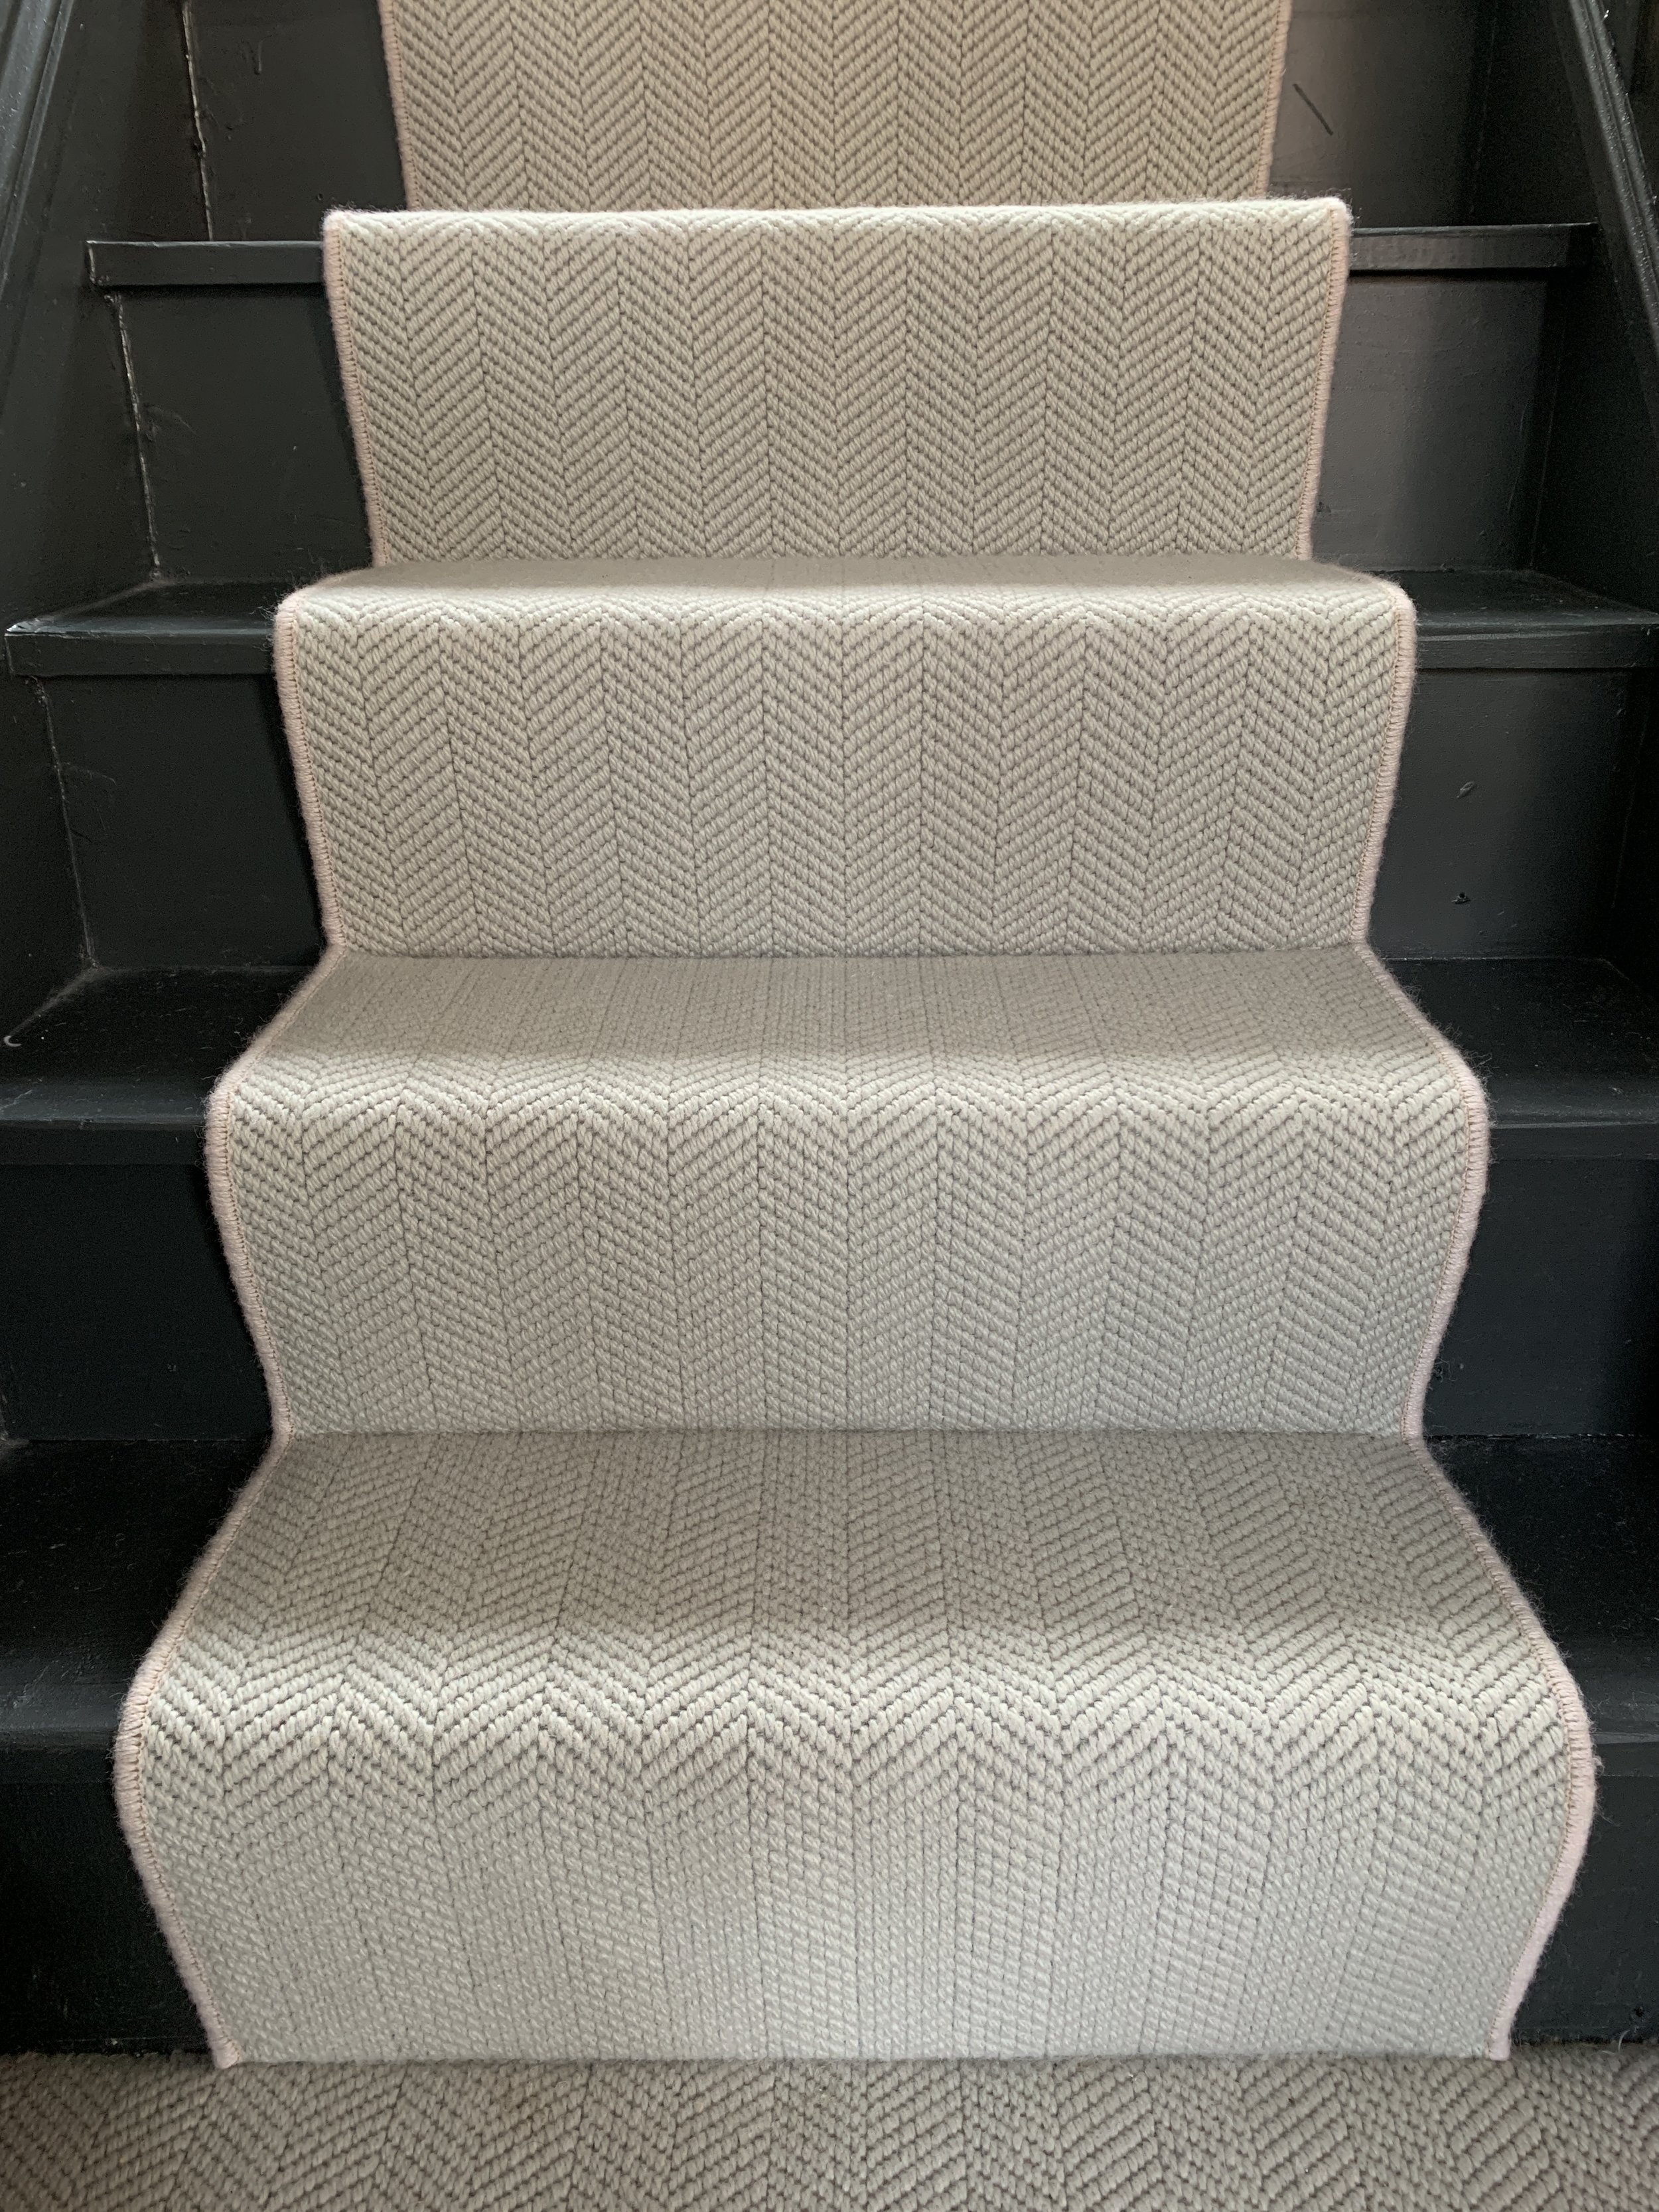
So I moved on to the Wool options. I wanted something with a bit of character and was drawn immediately to the Cascade range with its subtle chevron pattern. I ordered a sample in a few colourways (you can order up to five for free) and quickly settled on April Shower, a pale warm grey. It is light and I must admit I did wonder if I had taken leave of my senses slightly when it arrived because I have a light cream carpet in my daughters bedroom and numerous incidents over her three years on this planet have tested it to the max. Sudocrem and carpets do not get on, in case you were wondering…
But I loved it and decided that everyone in our house was going to have to wear those blue plastic shoe covers from then on. I jest. It’s been down for a few months now and I’m very impressed with how well it’s wearing. And it’s had its fair share of trials and tribulations already. My three-year-old wee’d on it the very same evening it had been fitted. But I acted quickly to soak it up (no rubbing) and there is no trace of it. Winning!

If we can just rewind a little. I haven’t told you about the pink whipping, or the expert fitting. I mentioned earlier that you can have most carpets whipped or taped around the edges to make them into a runner. Taping is a beautiful but expensive option, and not one that was within our budget for the amount of carpet we needed. Plus it wasn’t really the look I was going for in here. So I spoke to our carpet fitter Neil the Magic Carpet man about whipping. A good fitter really makes all the difference when it comes to slightly more complicated jobs like these and Neil is the bomb. If you’re based in SE London and you’re looking for a carpet fitter, hit me up for his details.
So I told Neil I wanted a dusky pink whipping colour matched to the Bohemia on our front door and cornicing. Pretty standard request right? Turns out it was. Neil took a painted out sample of the Bohemia to his contact and came back the next day with the carpet, ready whipped with the perfect match pink. I was so happy!
Then came the fitting. Prior to getting it whipped Neil had already spent a long time lining each piece of carpet up and cutting it to size. Because each flight of stairs is a different width and the carpet had a chevron pattern, each piece of carpet had to be cut to a different width…but you wouldn’t notice now it’s fitted.
It’s beautiful and once it went down, the whole project pulled together. I’m still not really over how much I love this carpet to be honest, and still wax lyrical about to my husband on a regular basis. Lucky him.
Lighting
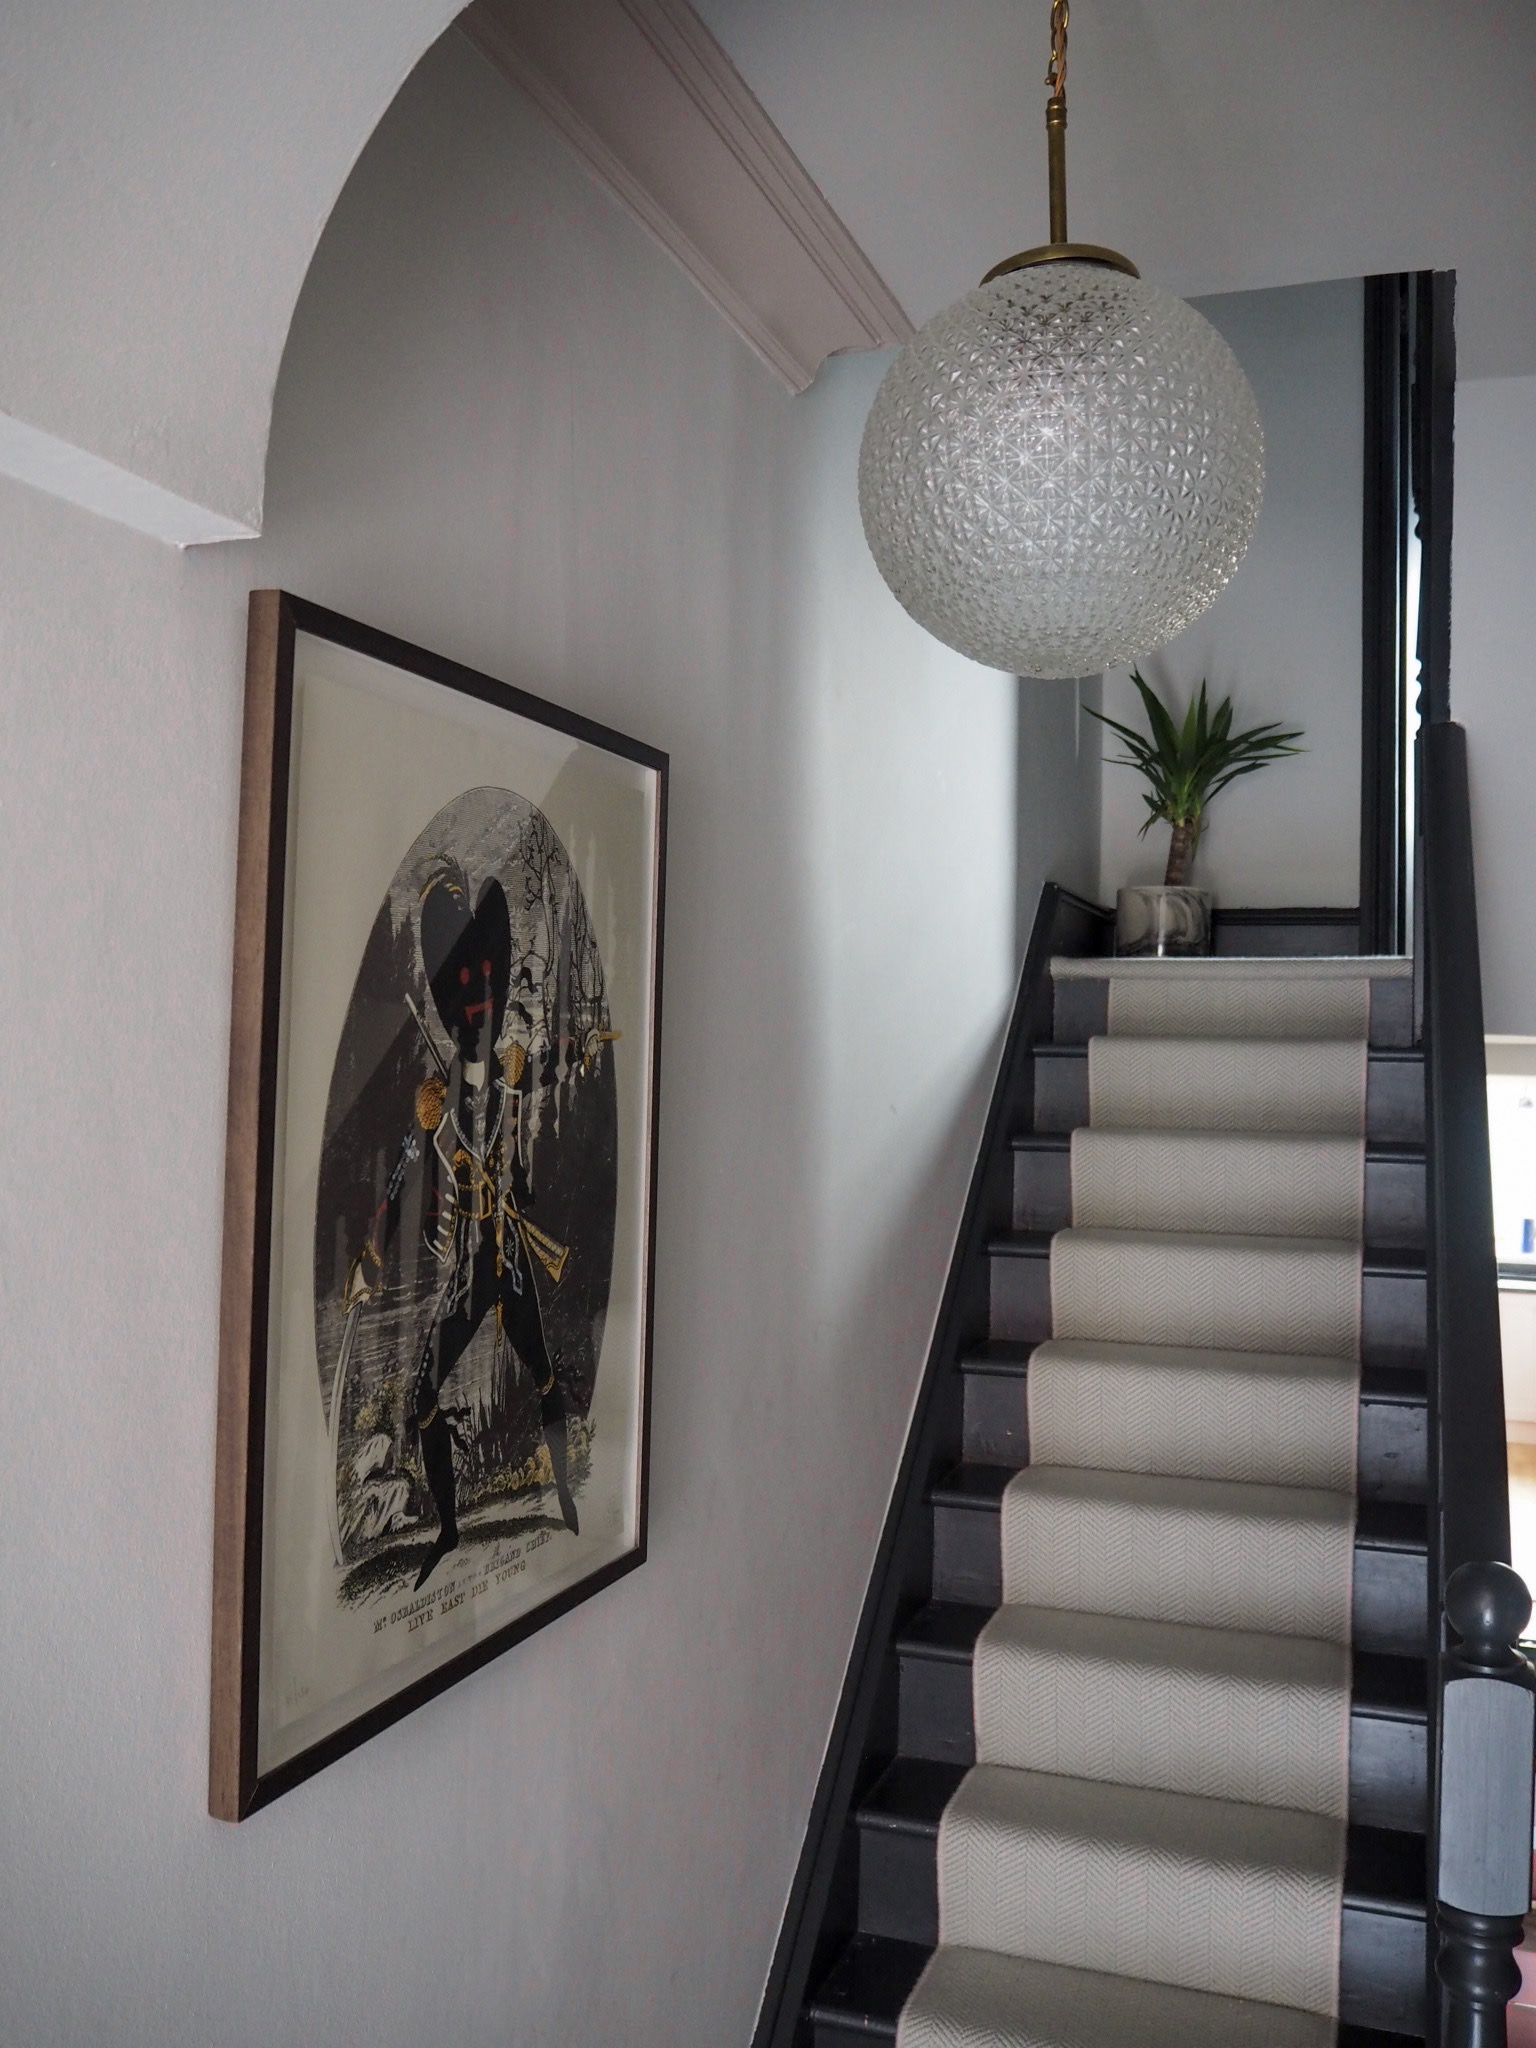
When it came to the lighting I was conflicted. There were chrome spotlights along the hallway and on every landing. Generally speaking I’m not a huge fan of spots however I had to admit the dark hallway did benefit from the extra light. So we decided to keep the spots but update them with brass LED’s with a warm rather than cold glow. We then removed the spot that was over the bottom of the staircase and replaced it with a pendant so we had the option of a softer light in the evenings. This beautiful vintage Czech globe pendant from Skinflint Design does exactly that. if you are looking for something unique I really recommend exploring Skinflint’s collection of vintage pieces which they have sourced and restored.

Finishing Touches
Now the big jobs were done, all that was left was to add a bit more personality to the space. I found a smoked grey mirror for behind the door to create the an illusion of space, and I found a lovely bench narrow enough to slot in without hindering the walkway (it’s the Raleigh from Made.com) and with plenty of room for our shoes underneath. We’ve already put up some art, including a Pure Evil piece I bought for my husband several years ago, and more recently the pink glass Girls Club sign from Pure White Lines, which was a very lovely birthday gift from my family. We’re going to add more as we go, but I like to take my time when it comes to getting art on the wall. We were also delighted to be given a Bramwell Brown Weather clock as we’ve always liked them…now I have no excuse for getting caught out without a raincoat on the school run! And last but not least I’ve gradually added some greenery. Plants are such an easy way to liven up any space but as there is not much light in hall, I opted for a faux Boston Fern from my friend Hello Flora.
I think that has covered everything. It started off very simple in here but I’m slowly adding more bits and bobs and character as we go. We’ve found that renovating this space has made such a difference to how we feel about the house as a whole. I think it felt like we were finally getting somewhere as the middle of the house now looks the part, if you know what I mean? Plus I’m no longer embarrassed when we have guests over.
Let me know if you have any questions about anything I have talked about here, I’d be happy to help if I can!
Thanks for reading,
J x
Gifted items - Kersaint Cobb carpet (I paid for fitting and whipping), vintage light from Skinflint design and Bramwell Brown weather clock


